Gameplay
Note
See also General tips for basic instructions.
Gameplay for Unvanquished and its predecessors has and continues to evolve every release. This page documents a gameplay guide both for new players and players of previous games (eg GPP Tremulous).
Contents
Gameplay Guide
Building system
Note
See also the Building gameplay page for more details.
Each team is given a set amount of structures and build points at the start of the match. These BP are used up to build more structures, and cannot be recovered once structures have been destroyed. Aliens must build leeches and humans must build drills to obtain more during the game.
Returns from drills and leeches decrease over time. It is very important to build some at the beginning of each match.
The more distant drills and leeches are from each other, the more efficient they are in extracting build points. If built too close together, they may conflict with each others and even destroy build points! So, place them with efficiency strategy in mind.
General tips
- Always have at least 2 spawnsn
- When moving base (ending with reactor and overmind), ensure you have spawns and defenses in the new base,
- You can prevent a building to explode by deconstructing it,
- Do not stay near “dead” buildings, they will explode and hurt you, except for aliens near alien buildings.
Also read humans and aliens specific tips.
Humans
The lists for equipment, buildings are in the Humans page.
Humans tips
- Don't run around alone. Unlike aliens, humans have little of chance escaping when they encounter and overwhelming force.
- Do take part in rushes whenever they're called. Even if you die, it's likely that you'll accumulate some credits whenever team mates kill the thing you shot at. If nobody calls a rush, just follow someone around and shoot at what they shoot.
- Don't use the Lucifer cannon, flame thrower, and pulse rifle to defend your base, you'll only end up hurting it.
- Look around a lot, learn the map, play as aliens to learn all the small details, or just spectate some aliens for a while to learn all the alien hiding spots.
- Radar is your friend, but you didn't need all wearing one.
Building
- Build turrets in such a way that they all support one another as much as possible. To this end, it is useful to build buildings that would block the turrets line of sight along walls, and especially in corners.
- Build rocket pod for long range attack. They don't fire if they can hurt human or building, so, they can't protect themself or anything. It's for long range attack only.
- Try not to cluster your base. If you must cluster, as you often will, it is better to have a few small clusters than to have everything in your base clustered slightly. Marauders will take full advantage of this. Advanced Marauder can also hurt structures that are immediately adjacent to each other.
- Take an account of how many of each critical structure are needed. Usually you need two telenodes, but a third may be needed if your team is unusually large or feeding. You need one armoury, but a second may be useful just in case the first is destroyed. Generally it is sufficient to have only one medistation powered by the reactor. Further medistations usually doesn't help as much as an extra turret. You also need the reactor itself, but that should be obvious by now. Each structure cost.
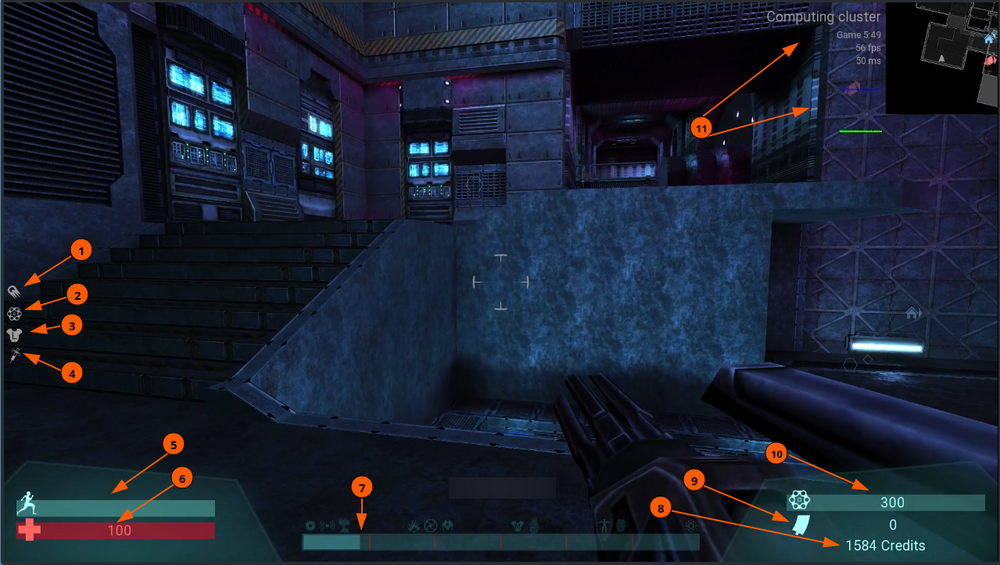
Interface for fighters
- The first weapons, always this weak Blaster, but can save your life in some situation
- The secondary (main?) weapon. On this picture it's the Chaingun
- Your Armor, nothing for [[Basic_Armour|Basic Armor], L for the Light Armor, M for Medium Armor, BS for the Battle Suit. Always buy armor first.
- Your medikit, use this! Usualy by the "f" key stroke.
- Your stamina, to run and to jump.
- Your health. If it's under 50% you should use your medikit. May be you should come back to the base too.
- The Momentum. This is increased when you kill Aliens and destroy their buildings. This allow you to access more equipment. If Aliens eat your drills or your buildings or humans... you will loose momentum and they will gain momentum. Don't feed them!
- The small red bar show when stages appends.
- How much credit do you have, to buy equipment.
- How many charger do you have. In this case there is none more available.
- How ammunition still available.
- The map, lag, FPS, times, where you are...
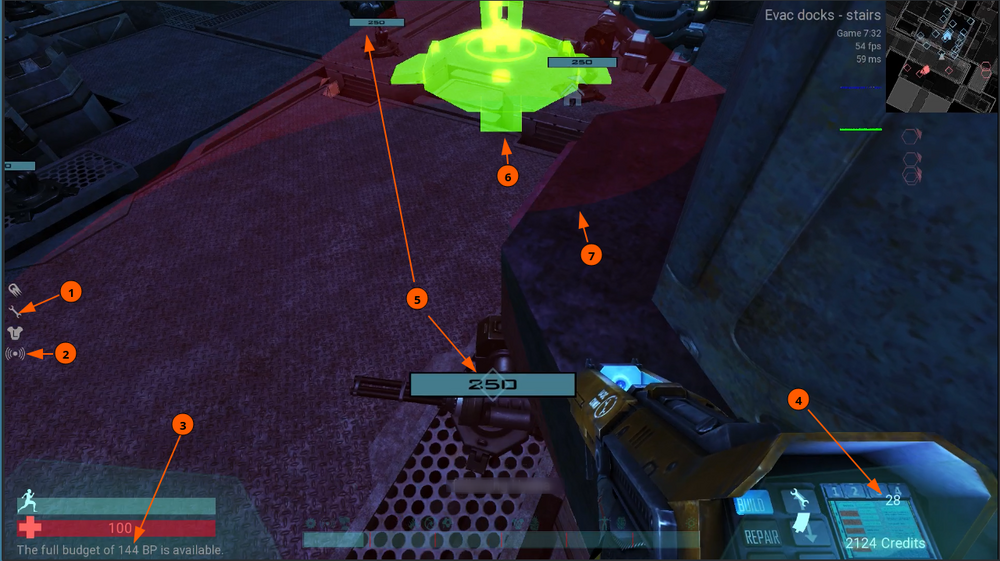
Interface for builder
Some information are visible on the fighter interface.
- The secondary weapon, the Construction Kit here, not a weapon in fact.
- The radar, allow you to give your team the position of aliens
- For builder, the BP (Build Points) available. Can be slowly regenerated
- How many points to build available. If negative, you can add drills, remove some buildings, destroy Leeches...
- The builder can know exactly the health for each human construction
- When green, the construction can be deployed at this place.
- For Machine gun and Rocket Pod, there is a "red" cone where they can't fire. Aliens can go under these and attack them
Aliens
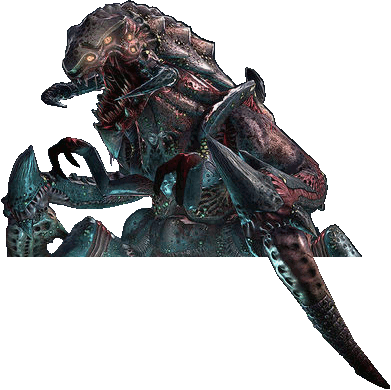
The lists for forms, buildings are in the Aliens page.
Aliens tips
- Always bite the head, even as a dretch. No need to jump to hit the head, just aim it. You can down an unarmored human in two bites to their head.
- Get used to wallwalking as a dretch, even if it feel disorienting. It can make you impossible to hit.
- Do remember to use your mobility to your advantage. With the sole exception of the granger, you will be able to outrun humans at any speed. Don't run straight.
- Don't simply walk on the ground if your form has other methods of movement. With everything from wall-walking to charging, aliens have a variety of ways to get across the map. These same movements also assist you with attacks, or may be attacks themselves.
- Evolving back to a lower form will cost you some evolution point, the more you're injured the more you lose, so make sure to heal completely before devolving, and since it will cost you something in all case, think twice before picking a new form: the next step in the evolutionary line may not necessarily fit your current situation. Devolving is only possible when being close to the overmind.
- A more expensive alien is not always better. Each alien is suited to different situations.
- Every alien buildable can heal you but the fastest ones are the overmind and the Booster. The Booster also gives you some poison to increase the damage you give to humans. Don't forget to pick poison before looking for preys if there is a Booster near to you!
Building
- Move buildings off the ground as early as possible. Grenades obliterate everything at human head height or below, but the damage done by acid tubes is not noticeably affected when they are built high on doorways. Prefer Hives when possible.
- Trappers are ineffective on the floor. They must be able to shoot and bind humans with their slow projectiles — build them pointing at doors.
- Don't pile buildings, especially acid tubes, together. A single grenade will obliterate everything at once and will propagate the fire.
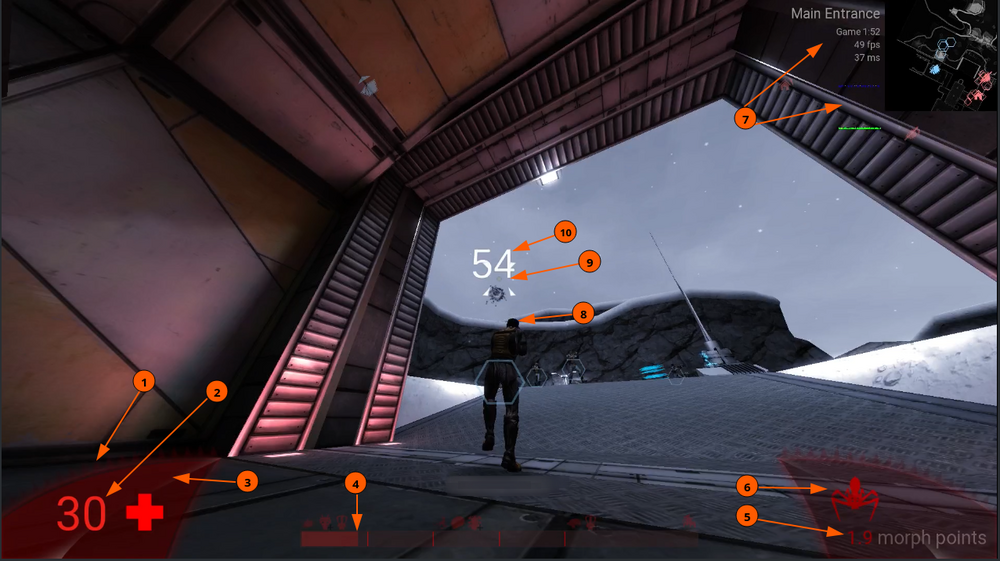
Interface for Aliens fighters
- The claws, when you crouch to walk on wall (actually not activated)
- Your health, with auto-regenerate (quicker near buildable, specially the Booster)
- This claw is filed as your health
- The Momentum. This is increased when you kill Humans and destroy their buildings. This allow you to access more morph. If humans destroy your leeches or your buildings or aliens... you will loose momentum and they will gain momentum. Don't feed them!
- The small red bar show when stages appends.
- How much credit do you have, to evolve to another form.
- Wich form you are. Actually the Dretch.
- The map, lag, FPS, times, where you are...
- With the Dretch, and other form too, you should target the humans heads, this will increase damages a lot
- The small dot (or cross at impact) show you where you will bit. Don't forget to raise a few when you are a Dretch.
- The amount (total) of damages done.
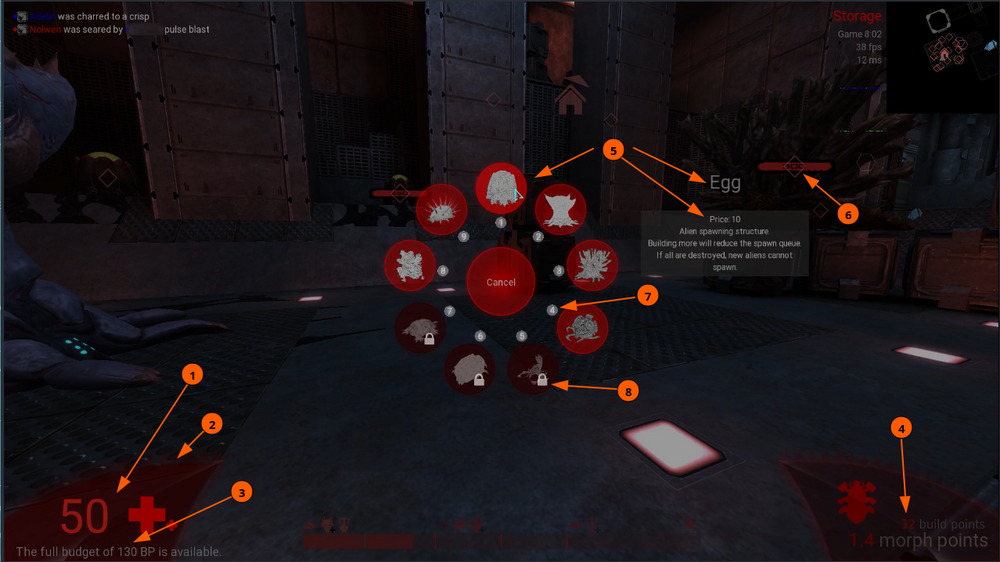
Interface for Alien Granger
- Your health, with auto-regenerate (quicker near buildable, specially the Booster)
- The claws, when you crouch to walk on wall (actually not activated).
- For Granger, the BP (Build Points) available. Can be slowly regenerated
- How many points to build available. If negative, you can add Leeches, remove some buildings, destroy Drills...
- When activated, the menu can show you what you can build, with the name, the price in BP and a description
- The Granger can know exactly the health for each Alien buildings
- The shortcut number to select the item (4 in the pic)
- This item isn't yet available, it's locked.

